This post is also available in:
![]() Türkçe (Turkish)
Türkçe (Turkish)
- Radio Frequency Transmitter and Receivers
- Module Pins and Its Functions
- Circuit Scheme
- 433 Mhz RF Module MikroC Library
- Operation Video
- Conclusion
- Library Files
- References
Radio Frequency Transmitter and Receiver
- Radio frequency, ie RF receiver transmitters, are used in many areas. It is used in every area from media to radio to remotely controlled devices.
- As it can be understood from its name, there are types working at different frequencies, but the usage of many frequencies is totally banned, or else it is subject to permission.
- The frequency that is free to use among these frequencies is the 433 Mhz. Therefore, we will go through 433 Mhz Receiver and Transmitter modules in this regard.
- As a basic working logic, the PIC sends data to the transmitter, which modulates this data, therefore it can increase the frequency thus it can go out of the air, so that the broadcasts perceive this data in the air in the receiver as well as demodulate it back into what the old PIC can perceive.
Module Type
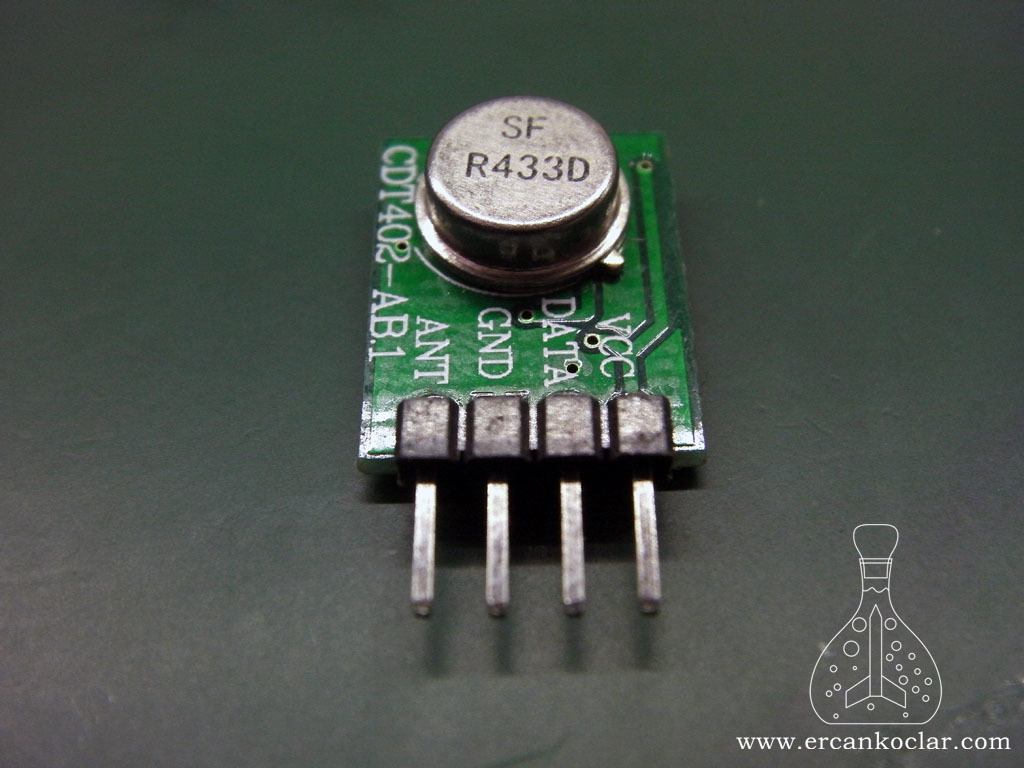
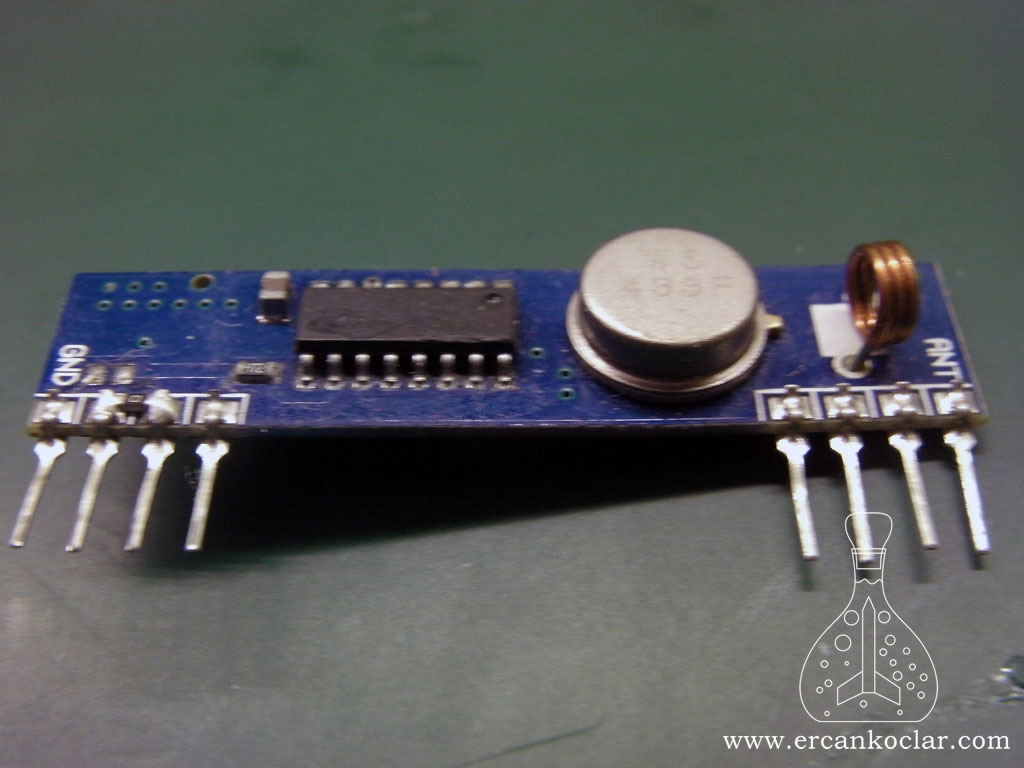
- Even if it is the same frequency, the modules have different modulation and demodulation types.
- Generally
- ASK : Amplitude shift keying
- FSK : Frequency shift keying
- I do not need to go into details for these, thus there are many types of submodulation besides this.
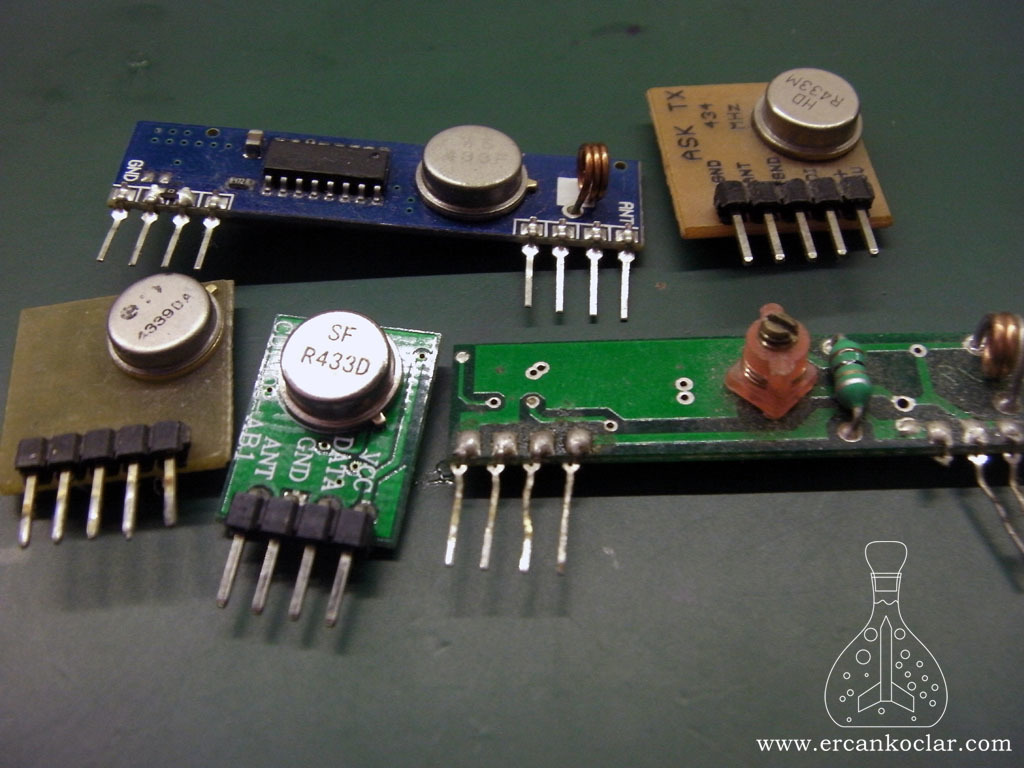
- The module we will use is the ASK type modulation transmitter and receiver, that you can generally find in market.
Frequency and Power
- I guess the power of our module is lower than 1 watt, although there is no clear information, that means it will not cause a health problem. you can also increase power with some add-ons, but remember that it is limited by law.
- Because 433 Mhz is in the UHF class, it is not reflected in the atmosphere, which means that it provides only a small amount of communication, means that, the receiver and transmitter must see each other.
- The module can be run at speeds up to 2400 baud, more acceleration will increase the errors.
- It can run between 5-12 volt.
Antenna
- I use ready-made antennas and sockets for 433Mhz as below, you can use a copper wire of 17.3 cm if you like.
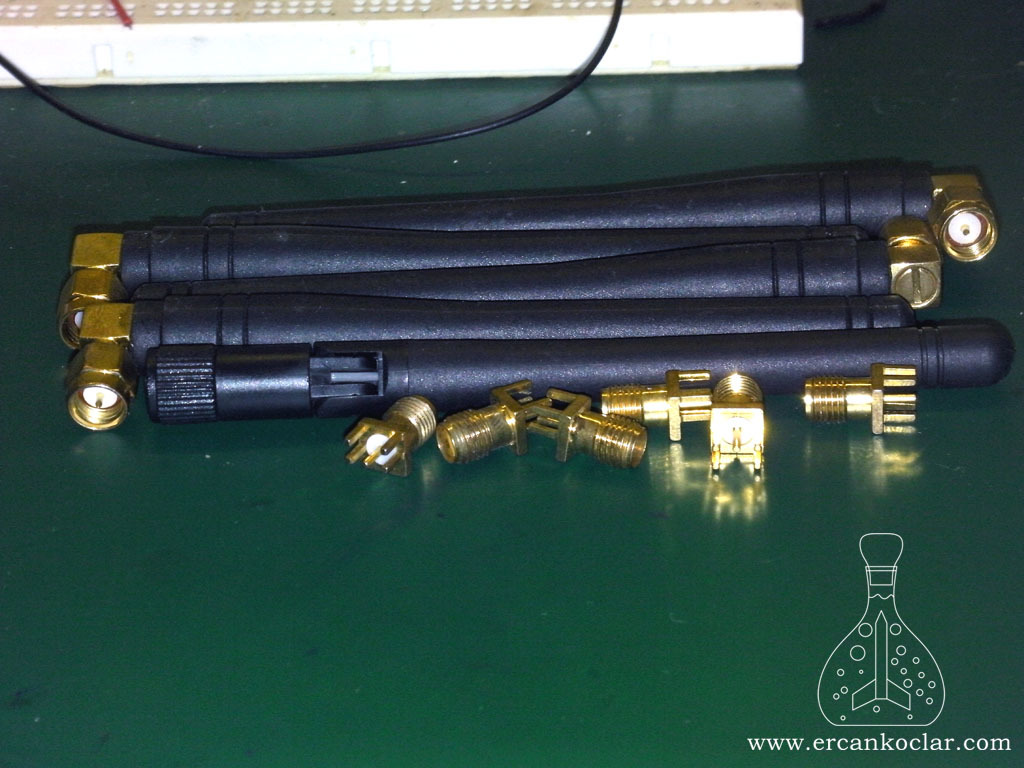
- For ready antennas, you should also use ready-made SMA connectors. These parts are made of brass because of the frequency transition. As you know, brass is a special material that is not loaded with static electricity.
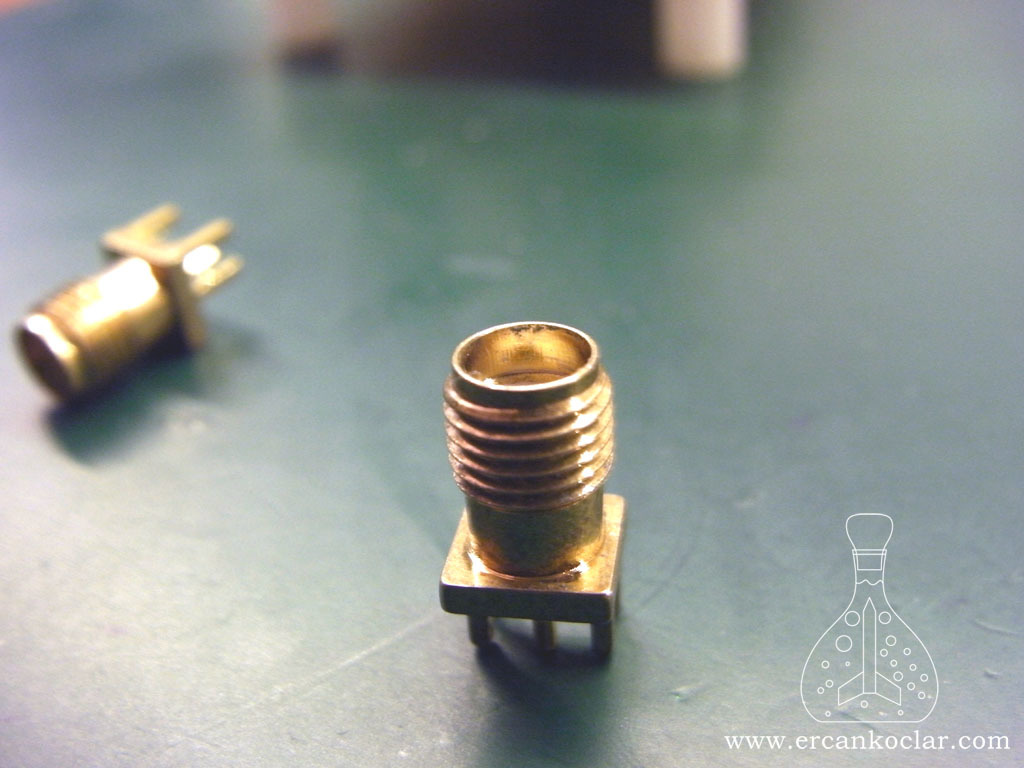
SMA connector. The middle leg is the connecting part and the other legs are attached to the chassis.
System Type
- We will see 2 type of system type in our practices
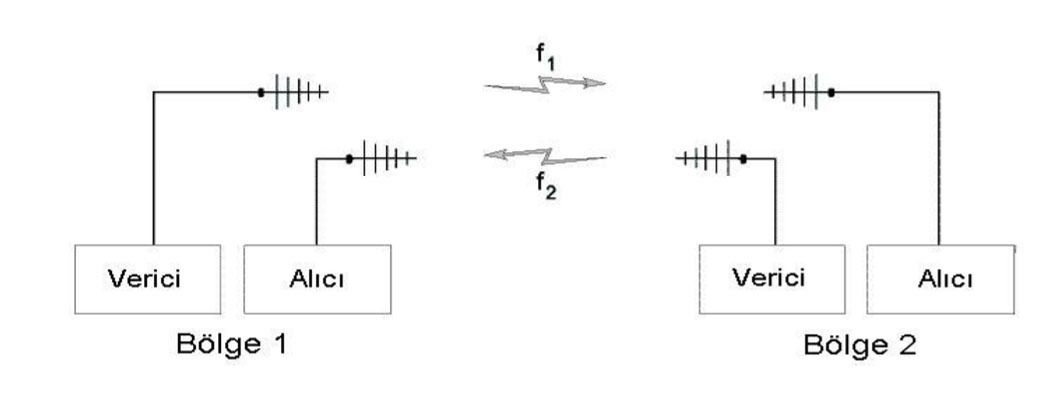
- One Way Simplex : It consists of 1 receiver and 1 transmitter in a reciprocal way, does not give a feedback, the data goes on one way
%22%20transform%3D%22translate(1.9%201.9)%20scale(3.71094)%22%20fill%3D%22%23fff%22%20fill-opacity%3D%22.5%22%3E%3Cellipse%20rx%3D%221%22%20ry%3D%221%22%20transform%3D%22matrix(9.7226%20-12.71664%2012.93742%209.8914%20122.5%2061.2)%22%2F%3E%3Cellipse%20cx%3D%22188%22%20cy%3D%2231%22%20rx%3D%2231%22%20ry%3D%222%22%2F%3E%3Cellipse%20cx%3D%22231%22%20cy%3D%2237%22%20rx%3D%226%22%20ry%3D%226%22%2F%3E%3Cpath%20d%3D%22M88.7%202l2.5%2028.8-14%201.3-2.4-29z%22%2F%3E%3C%2Fg%3E%3C%2Fsvg%3E)
433mhz-rf-alici-verici-tek-yonlu-simpleks “image is taken from e-book Aydın Bodur Radyon Mühendisliği Notları”” - Full Dublex : There are reciprocal, both receiver and transmitter, does feedback and data goes bi-directionally
General Notes and Cautions
- RF receiver and transmitters must not kept close to each other while running, this may cause instability.
- In Full Dublex systems, always 1 transmitter must be active if 2 transmitters are open at the same time, they tend to block each other (jamer effect) and communication cannot be provided.
- Even on prototype circuits, modules must be soldered.
- Modules should be plugged as close to the PIC as possible, even EMI filters can be applied (not tested on prototype)
Module Pins And Their Functions
- Check the photo below, which consists of numbered legs, can make it easier to figure out which pin number is stated.
Receiver Module Pins
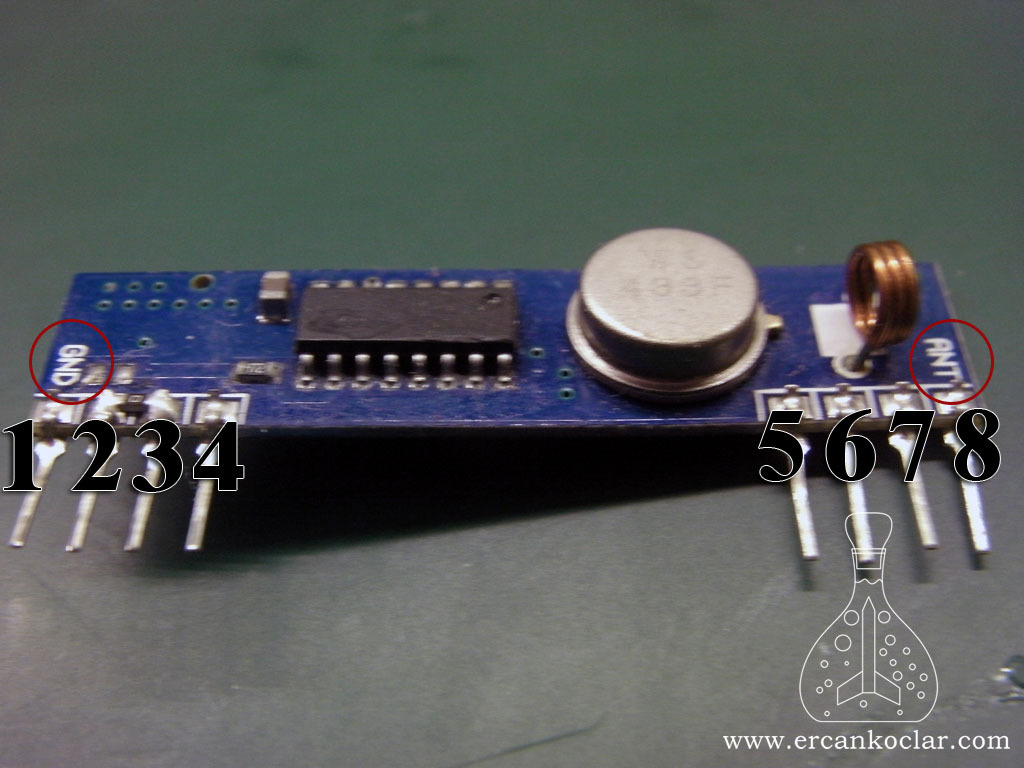
| Pin | Pin Adı | Description |
| 1 | DGND | Digital GND Connected to power source |
| 2 | DATA | Digital Data Output- Connected to PIC |
| 3 | NC | – |
| 4 | Vcc | +5v Feeding |
| 5 | Vcc | +5v Feeding- Left empty. no connection shall be made |
| 6 | GND | RF gnd – Never connect to the ground of circuit |
| 7 | GND | RF gnd – Never connect to the ground of circuit |
| 8 | ANT | Antenna input |
- Antenna grounding and other RF GNDs should never be connected to the GND of the electronic circuit, if it is possible, it must be grounded in real. If it is not possible, it should be left blank.
- According to the manufacturer’s notes, Pin 4 feed is done and feeder number 5 is left empty.
- Modules should never be used with a socket, it must be absolutely soldered, or you may experience problems when working.
Transmitter Module Pins
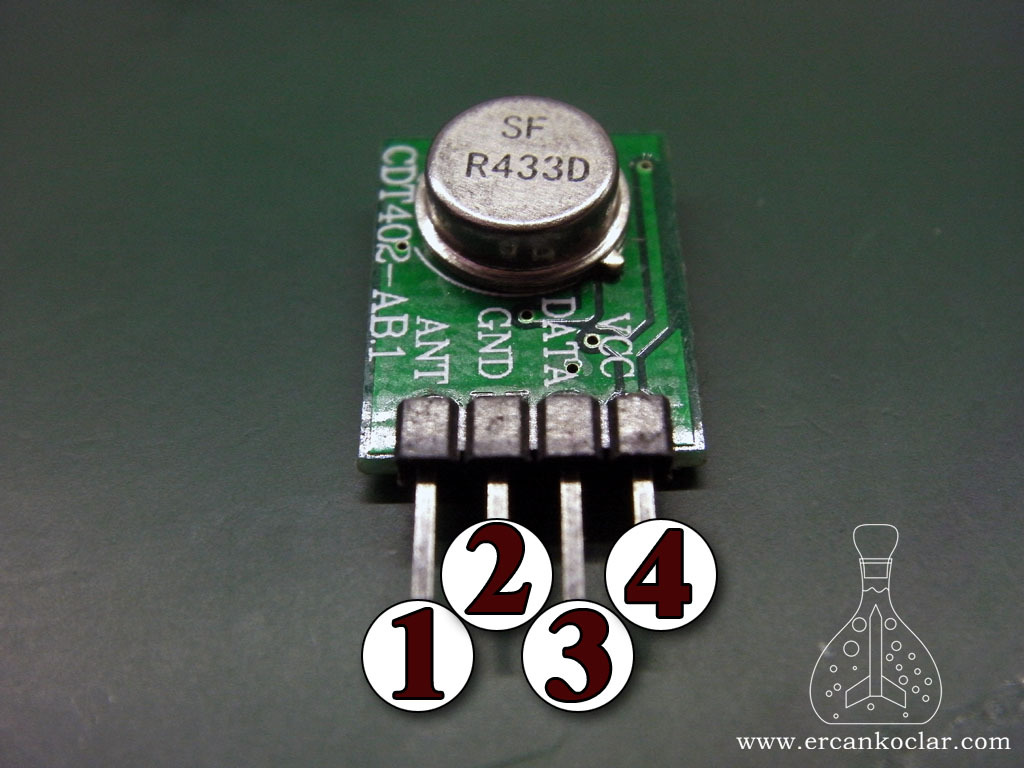
| Pin | Pin Name | Description |
| 1 | ANT | Antenna connection shall be made |
| 2 | GND | Connected to Circuit GND |
| 3 | DATA | Data input is done here – connected to PIC |
| 4 | Vcc | +5-12 Volt feeder is connected |
- As I mentioned above, the module must be soldered.
- The supply voltage may vary in some modules but is generally the same. Increasing the voltage can reduce the accuracy while extending the distance, they should be well-tried and decided according to the user preference. I experimented with feeding the standard 5 volts.
Circuit Scheme
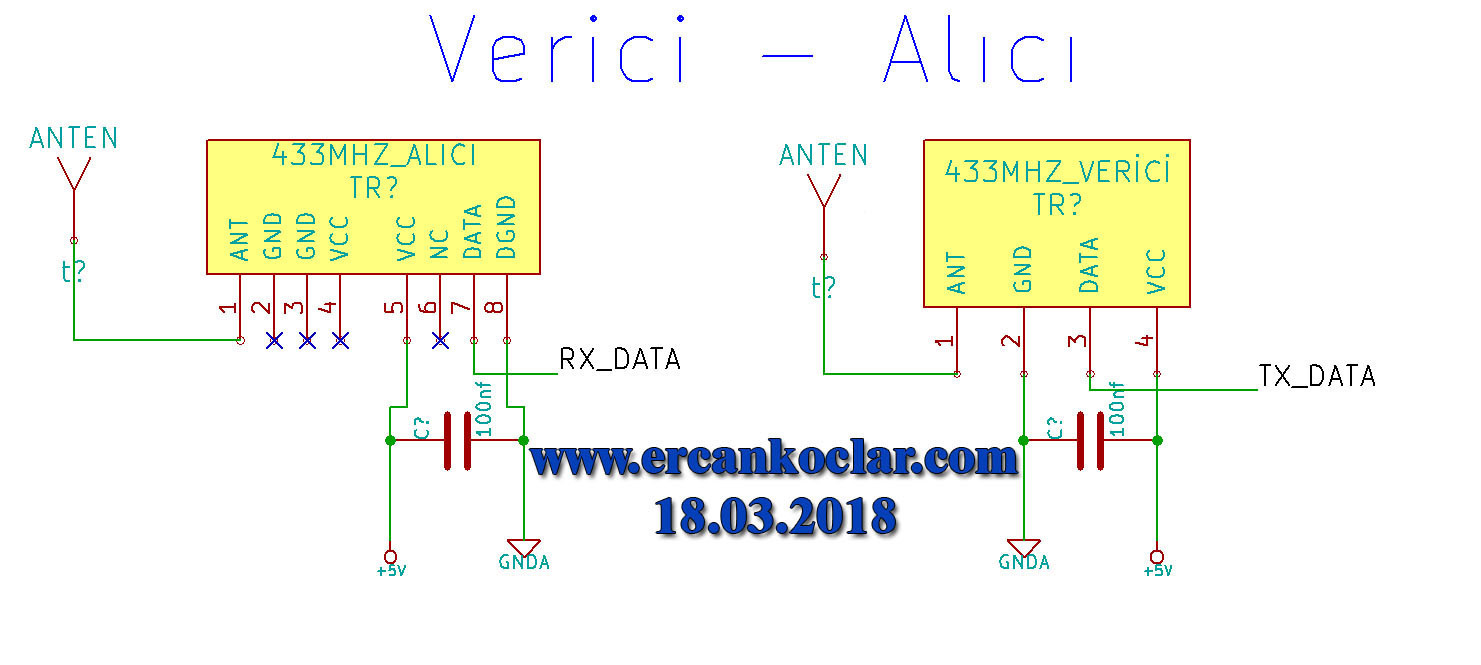
- It has been stated that EMI filter can be placed between Vcc and DGND for the receiver, and the Vcc is coiled to the end but I have not tested them
- Note that the leg numbers in the picture and the Pin table are written reversely
Necessary Materials
- 433 Mhz Transmitter Module
- 433 Mhz Receiver Module
- Perforated Pertinax Board
- 433 Mhz Antenna
- SMA Connector
Making Circuit
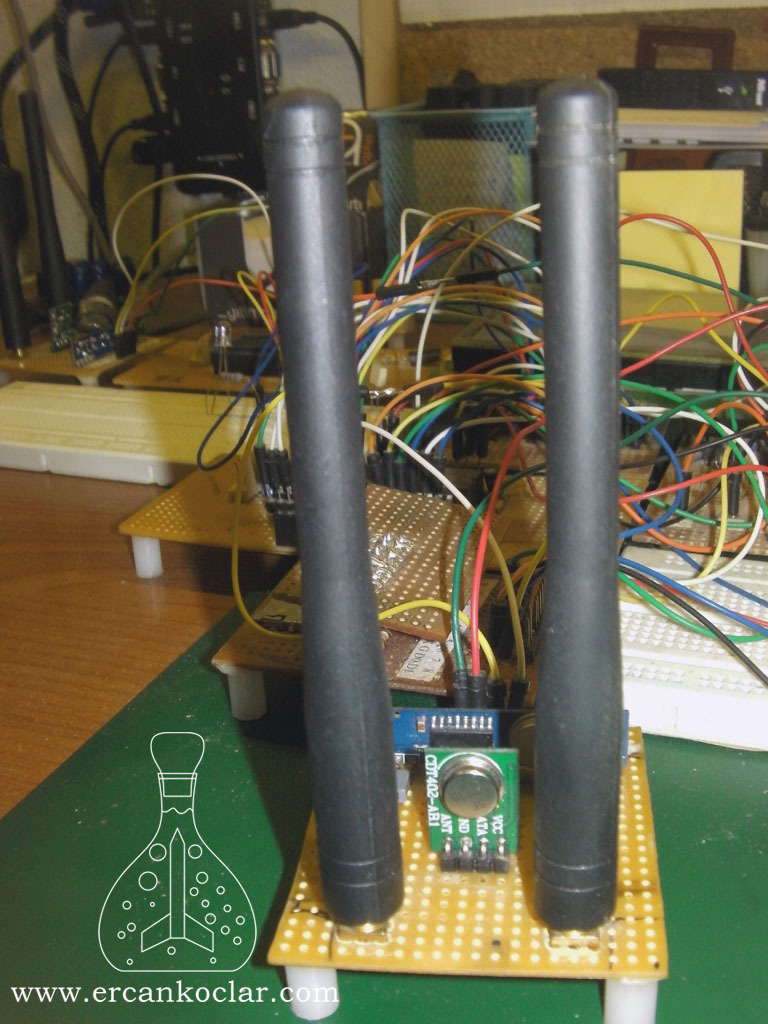
The appearance of a full duplex unit / receiver and transmitter have separate antennas
- As you can see above, since I have also tested the full dublex system, there are both receivers and transmitters on the same card. Therefore, there is a separate antenna for each.
- There is also semi-duplex, which is a method of using 2 modules with one antenna, but since I did not try this, I can not explain anything about this issue
- In this case, the receiver and the transmitter will not communicate with each other, but with the other module (it is on the top left). that is, for a mutual data stream.
- You do not need anything extra for the circuit. After all, these modules are just tools.
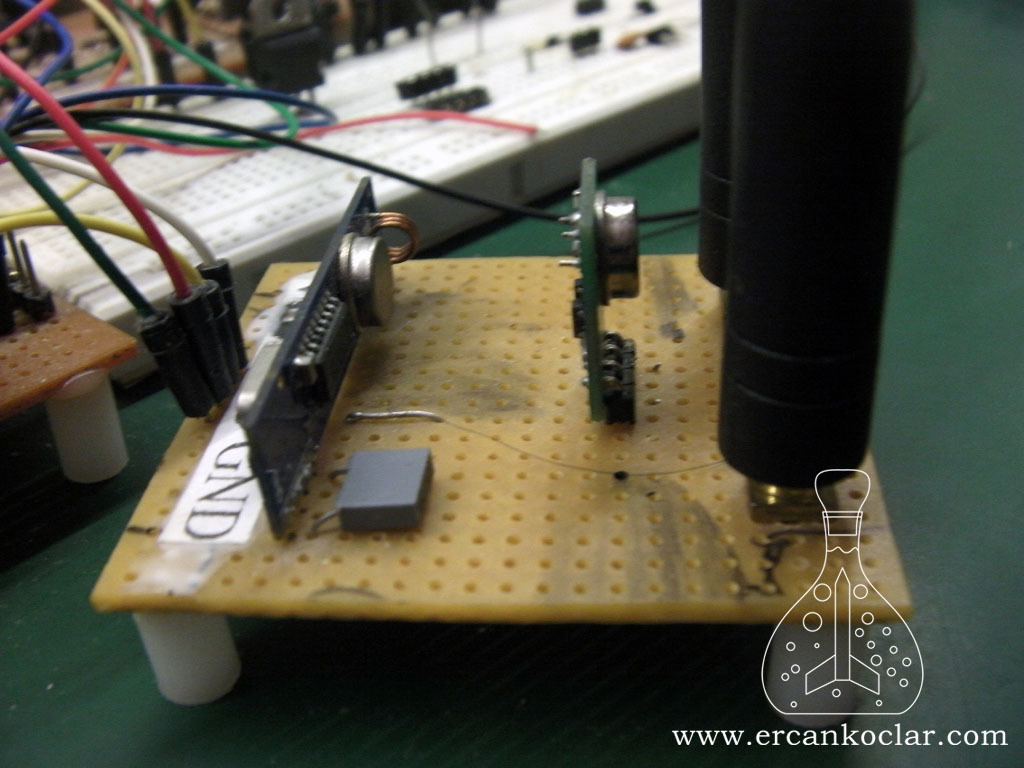
- Modules must be soldered.
- Since this was a test circuit, the PIC connection was made with a jumper cable, which could cause problems during the operation because it is actually a fault for this circuit. Because RF or Wireless is a parasitic source of all the systems and the PIC should be plugged closer to the cable, it is incorrect to take it away. If the antenna is far away, the last antenna must be connected to the extended end of the antenna with a coaxial antenna cable.
433 Mhz RF Module MikroC Library
- To mention library features; it is primarily to send simple commands such as the basic purpose of these modules and to provide remote control. So you can send simple commands to any system or any device, turn the light on and off, turn left and right. These can be accomplished in a simple way
- The other more complex purpose is data transfer. So with this library it is theoretically possible to send 255 * 8 bits ie 256 bytes at a time. I tested 30 bytes at most once, but I think this is a good value
- I used CRC7 from the CRC library that I wrote earlier in my data transmission, so it is 99.9% accurate when the transmitted data arrives. I mean, I controlled the accuracy of the data transfer firmly. This is of course a waste of time, but you can use it in data transfer and ignore it in simple commands.
- I made some examples below. These are completely basic algorithms, you can design yourself on each system and on demand. In fact if you share with me, I’ll be delighted. You can write new algorithms using our basic functions.
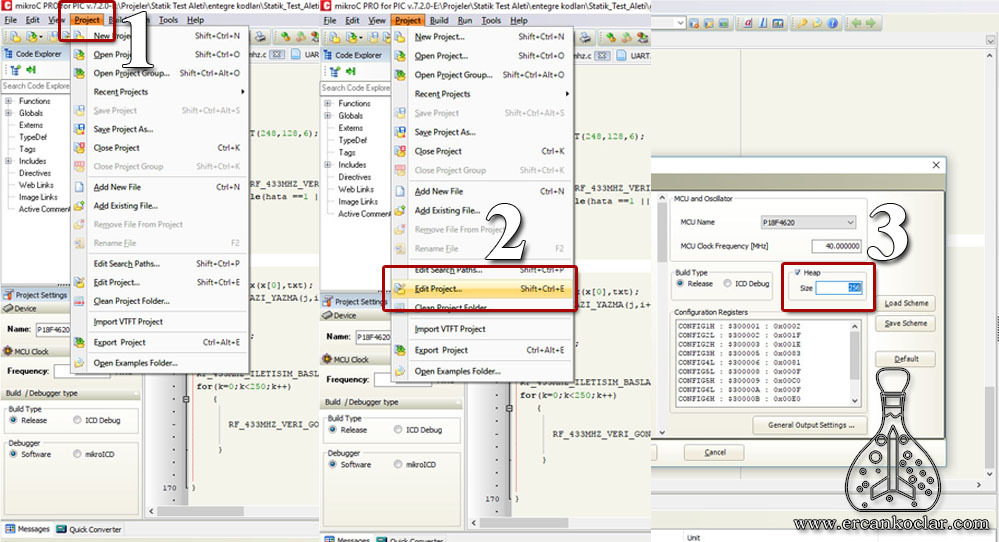
- Get back to data transfer subject, he logic was set up with a flexible set of systems. For this reason, you need to allocate 256 bytes of space as Heap in MicroC, which does not always use it, it allocates space in the amount you specify. The sequence takes the loaded data and creates and sends the CRC code. You can create as many series as you want between 1-255.
- The RF Library is working on the UART library I wrote earlier. Therefore, you must include the UART library to your project.
- From the picture below you can see how you can separate the heap space in MicroC. Project->Edit Project->Heap
Functions
- There are 3 user functions
- Here, it will be explained in a simple way, followed by examples in details.
–RF_433MHZ_ILETISIM_BASLAT Function
Function : void RF_433MHZ_ILETISIM_BASLAT(unsigned char SENKRON_BIT_SAYISI)
Purpose: Sends mixed data, which wakes up the receiver before sending the data and makes it synchronized.
Parameters:
- SENKRON_BIT_SAYISI : Creates a loop as much the value entered here.
Usage:
RF_433MHZ_ILETISIM_BASLAT(150);//Send 150 sets of synchronous data
Feedback : Does not do feedback
-RF_433MHZ_VERI_GONDER Function
Function : void RF_433MHZ_VERI_GONDER(unsigned char *VERI,unsigned char DIZI_SAYISI,unsigned char CRC7_POLINOM,unsigned char ON_TANIMLAMA_KODU)
Purpose: Sends data to the receiver
Parameters :
- *VERI : It is pointer. The name of the series that we want to send is written into this part.
- DIZI_SAYISI : States how many series are there.
- CRC7_POLINOM : The polynomial we want to use for CRC control is written here. It must be same at the receiver and transmitter.
- ON_TANIMLAMA_KODU : In order to avoid confusion of the transmitted data, an 8-bit prefix code must be specified and it must be identical for the receiver and transmitter.
Usage:
 erc[0]=1;
 erc[1]=3;
 erc[2]=5;
 erc[3]=7;
 erc[4]=9;
 erc[5]=10;
 erc[6]=12;
 erc[7]=14;
 erc[8]=16;
 erc[9]=18;

RF_433MHZ_VERI_GONDER(erc,10,0b10001001,21);
Feedback : Does not do feedback.
-RF_433MHZ_VERI_AL Function
Function : unsigned char RF_433MHZ_VERI_AL(unsigned char *VERI_HATASI,unsigned char DIZI_SAYISI,unsigned char CRC7_POLINOM,unsigned char ON_TANIMLAMA_KODU)
Purpose : It reads the data sent by the transmitter
Parameters :
- *VERI_HATASI : The function does the corresponding feedback with the flag method, not with return. If this parameter equals to:
- 1 parity bit error
- 255 crc error
- 0 data is received correctly.(transmitted from transmitter to receiver.)
- DIZI_SAYISI : The number of readable series is specified
- CRC7_POLINOM : The crc polynomial to be used to analyze incoming data
- ON_TANIMLAMA_KODU : The first step to know if incoming data is correct
Usage:
do{
    x=RF_433MHZ_VERI_AL(&hata,30,0b10001001,21);//&error handling is used to read the internal pointer
  }while(hata ==1 || hata ==255) //  check whether there is a crc error in the parity bit with the error variable
//the data sent can be read from variable x
Feedback :
- Function returns the read data.
- Error check is made by reading *VERI_HATASI flag. If it equals:
- 1 parity bit error
- 255 crc error
- 0 data is received correct.(transmitted from transmitter to receiver)
Functions Application
- We will see the samples in two varieties
- Basic Command Submission means remote control function
- Data Transfer transfer larger files
Basic Command Submission
- With this system, we can control a vehicle with a simple 8 bit remote commander.
- Generally, one-way communication is sufficient. “One Way Simplex“
- Let’s examine the example
//RECEIVER CODES//
//IT WILL BE USED FOR UART RECEIVER PIC
 sbit UART_RX at RC7_bit;
 sbit UART_TX at RC6_bit;
 sbit UART_RX_Direction at TRISC7_bit;
 sbit UART_TX_Direction at TRISC6_bit;

void  main()
{
    unsigned char erc[1];
    unsigned char hata;
    unsigned char x;

    ADCON1=13;
    CMCON=7;


do{
     x=RF_433MHZ_VERI_AL(&hata,1,0b10001001,29);

   }while(x!=125);

// operation to be performed after command
- With the Do-While cycle, the receiver is on standby.
- First, the incoming data prefix code is checked, if “29” is true, then the CRC7 encoded data is received
- If the CRC7 polynomial is “0b10001001” and the result is 0, the data is accepted as correct
- However, as seen in the condition, the parity bit of the CRC is not checked because it is a simple command, so only the incoming command is checked so that the “125” command is executed and the loop is finished.
//TRANSMITTER CODES//
//IT WILL BE USED FOR UART TRANSMITTER PIC
 sbit UART_RX at RB2_bit;
 sbit UART_TX at RB3_bit;
 sbit UART_RX_Direction at TRISB2_bit;
 sbit UART_TX_Direction at TRISB3_bit;


void  main()
{
    unsigned char erc[1];
    unsigned char i=0;


    ADCON1=13;
    CMCON=7;


 erc[0]=125;


   RF_433MHZ_ILETISIM_BASLAT(50);
   for(i=0;i<40;i++)
     {
       RF_433MHZ_VERI_GONDER(erc,1,0b10001001,29);
     }
- First we send it in 8 bits and we assign it to a series
- Then later with”RF_433MHZ_ILETISIM_BASLAT(50)” we send 50 times wake up and synchronization data, you can reduce the length of it as you like. However, this can be long in long data, but it can be a bit too long for 8 bits of data
- “RF_433MHZ_VERI_GONDER(erc,30,0b10001001,21);” with this function we send our command
- As you can see, we sent the command 40 times because wireless communication is never like wired communication. sometimes even these values are not enough and it is necessary to send again because the signals may be distorted in the air and the synchronization may be difficult, so it must be sent again as much as possible in order to be guaranteed.
- This is precisely the reason why we made a connection as it is in daily life and after a while the “connection failed” error. a certain number of commands are sent, but if synchronization can not be guaranteed, the system will stop or restart the connection
- Do not forget that this is the only way to do one-way communication, but try optimizing algorithms that are appropriate for your projects.
Data Transfer
- With this system, we will see large-scale data transfer. In fact, this is not much different from sending command.
//RECEIVER CODES//
//IT WILL BE USED FOR UART RECEIVER PIC
 sbit UART_RX at RC7_bit;
 sbit UART_TX at RC6_bit;
 sbit UART_RX_Direction at TRISC7_bit;
 sbit UART_TX_Direction at TRISC6_bit;

void  main()
{
    unsigned char txt[7],erc[30];
    unsigned char hata,y=0;// stringe çevrim için oluşturuldu
    unsigned char i=0,j=1,k=0,t=0,z=0,w=0;

    unsigned char *x;
    ADCON1=13;
    CMCON=7;


SAP1024_INIT(248,128,6);//GLCD analysis command

//first data reading
do{
     x=RF_433MHZ_VERI_AL(&hata,30,0b10001001,21);
  }while(hata ==1 || hata ==255);//error control

//read data is printed on the screen
for(l=0;l<30;l++)
  {

  ShortTostr(x[l],txt);
  res = Ltrim(txt);//erases space on the left side of data
  SAP1024_YAZI_YAZMA(j,i,res);//GLCD writing on the screen command
  i++;
  if(i>16){j=j+3;i=1;}//GLCD de column line setting

  }

erc[0]=255;

//notification of data receipt
RF_433MHZ_ILETISIM_BASLAT(150);
for(k=0;k<250;k++)
   {
     RF_433MHZ_VERI_GONDER(erc,1,0b10001001,20);
   }
}
- This section is essentially as a receiver. but as it will eventually be seen, it makes a notification back, meaning that it sends data to the transmitter of the data, and pass the information that the data is correct
- When the data is received, it is loaded into the X variable at the address of the first element of the series when the parity bit and the crc control are performed, as shown in do-while
- This data is then printed on the screen using the GLCD library, as I wrote earlier
- Afterwards, a command is sent to the source that sends the data, meaning that the data has been handed over.
- Therefore the transaction is completed as full duplex
//IT WILL BE USED FOR UART TRANSMITTER PIC
 sbit UART_RX at RB2_bit;
 sbit UART_TX at RB3_bit;
 sbit UART_RX_Direction at TRISB2_bit;
 sbit UART_TX_Direction at TRISB3_bit;


void  main()
{
    unsigned char txt[7],erc[30];
    unsigned char hata,y=0;// created to transform into string
    unsigned char i=0,j=1,k=0,t=0,z=0,w=0;

    unsigned char *x;
    ADCON1=13;
    CMCON=7;

    //LED's port settings to be switched on after confirmation
    trisb.rb1=0;
    portb.rb1=0;

 //the data sequence was written in this way for clarity. of course, the "for" loop will make more sense
 erc[0]=1;
 erc[1]=3;
 erc[2]=5;
 erc[3]=7;
 erc[4]=9;
 erc[5]=10;
 erc[6]=12;
 erc[7]=14;
 erc[8]=16;
 erc[9]=18;
 erc[10]=1;
 erc[11]=3;
 erc[12]=5;
 erc[13]=7;
 erc[14]=9;
 erc[15]=10;
 erc[16]=12;
 erc[17]=14;
 erc[18]=16;
 erc[19]=18;
 erc[20]=1;
 erc[21]=3;
 erc[22]=5;
 erc[23]=7;
 erc[24]=9;
 erc[25]=10;
 erc[26]=12;
 erc[27]=14;
 erc[28]=16;
 erc[29]=18;


   RF_433MHZ_ILETISIM_BASLAT(150);//first the wake-up signals are sent
   for(k=0;k<250;k++)//data is sent 250 times because of the size of the data
     {
       RF_433MHZ_VERI_GONDER(erc,30,0b10001001,21);
     }

//anticipation of a confirmation command
  do{
     x= RF_433MHZ_VERI_AL(&hata,1,0b10001001,20);
    }while(x[0]!=255);


  portb.rb1=1;// the LED connected to the port lights up after confirmation

}
- As seen above, the 30-element series is loaded and sent
- Here the length of the loop numbers is related to the size of the data
- After the data is transmitted, the transmitter in this system is silent, the receiver works, and on the opposite side the receiver is silent, the transmitter works, ie the full duplex system is fulfilled.
- The LED is lit when the desired confirmation command is received
- You can improve the system by taking the path from this example, for example, it is possible to add innovations such as sending data again after a certain period of time. This has been added solely in terms of giving you an opinion.
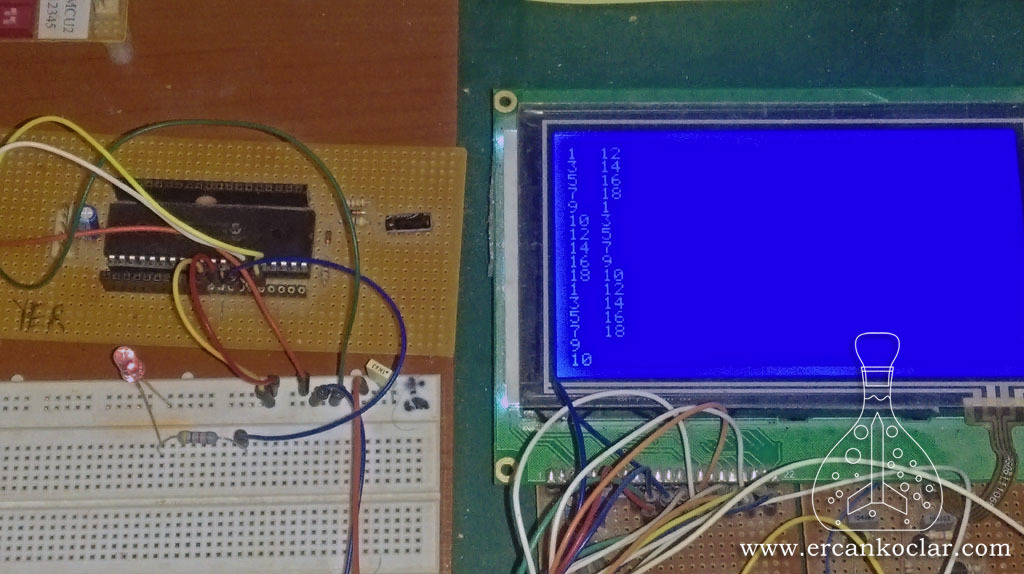
- 30byte (30*8bit) data was sent and then when the check came, the led went on. You can check the correctness of the data from the code page.
Experiment Video
Result
- Wireless communication should never be considered wired. In wireless communication, the data must be sent multiple times.
- The full duplex above is just a simple example. In fact, in order for the system to function properly, a certain number of data will be sent first, then it will be relayed. If there is no acknowledgment, it will send again and continue this way until the number of loops you have specified. The basis of a communication system in a real sense should be established with this logic.
- As shown in the video, the data is not always transmitted in 3-4 sec. This video system is restarted four times in order to get the video data. This is the natural condition of the wireless system. For this reason you should build a system by grasping the logic of the previous material well.
- These functions are basically written. You can use UART library or RF library to develop better systems. If you want to install your own system with UART, you can include the CRC function you want from CRC library instead of CRC7.
- Do not forget that CRC is indispensable in a correct communication system. The one-bit parity system is never enough for data security, especially for wireless data security. Because, under normal conditions, only the receiver module is activated and if you reflect each incoming data on the screen, you will see that a lot of mixed signals are coming in one second without stopping. In this case it is even more than imagination to send accurate data without CRC.
- You can ask your questions on “Question-Answer” Forum.
Library Files
- 433 MHz RF Transceiver MikroC Library – .mcl – (FREE)
Bağlantıyı Görmek İçin Giriş Yapın ya da Ücretsiz Üye Olun
- UART MikroC Library – .mcl – (FREE)
Bağlantıyı Görmek İçin Giriş Yapın ya da Ücretsiz Üye Olun
- CRC MikroC Library – .mcl – (FREE)
Bağlantıyı Görmek İçin Giriş Yapın ya da Ücretsiz Üye Olun
References
- A Tutorial on Applying Op Amps to RF Applications
- Analog Transmission Analog Transmission of Digital Data of Digital Data ASK, FSK, PSK, QAM
- Circuit Detects and Locates Hidden RF Bugs
- DENEY NO1 SAYISAL MODÜLASYON VE DEMODÜLASYON
- Digital-Modulation-Techeques
- Dynamic Performance Requirements for High-Performance ADCs and RF Components in Digital Receiver Applications
- Experiment # (5) ASK modulation
- Improving Temperature, Stability, and Linearity of High Dynamic Range RMS RF Power Detectors
- KABLOSUZ SERD HABERLEŞME UYGULAMALARI VE RF KONTROL
- RF LINEAR HYBRID AMPLIFIERS
- Understanding RFMicrowave Solid State Switches and their Applications
This post is also available in:
![]() Türkçe (Turkish)
Türkçe (Turkish)
